
Before we had machines to puree, juice, and churn our food, cooks had to do it all by hand.
I love my kitchen appliances. I use my food processor almost daily. I consider my immersion blender one of my top three favorite belongings. My coffeemaker has been with me through three jobs and two major relationships, and it continues to make my mornings happy and bright.
But beyond that, I am very cautious about what appliances and tools I allow into my kitchen. They’re often expensive, and they usually take up counter space (which I don’t have a lot of).
As a chef, I know that to be successful in the kitchen, all you really need are a few pots and pans, some mixing bowls, a good cutting board, a sharp chef’s knife, a whisk, spatula and a wooden spoon. Before we had machines to puree, juice, and churn our food, cooks had to do it all by hand. So before I buy a new kitchen toy (or when I’m working in a kitchen with limited stuff), I always ask myself, “can I accomplish what this appliance does by hand?” More often than not, the answer is “damn right I can.”
Read on for my favorite low-tech kitchen hacks.
Make ice cream…without an ice cream maker!
1. Fill a large bowl about halfway with about 4 cups of crushed ice (see below for tips on crushing ice the low-tech way). Stir in 3/4 cup rock salt (look for this in the baking aisle -- it’s often labeled “ice cream salt”).
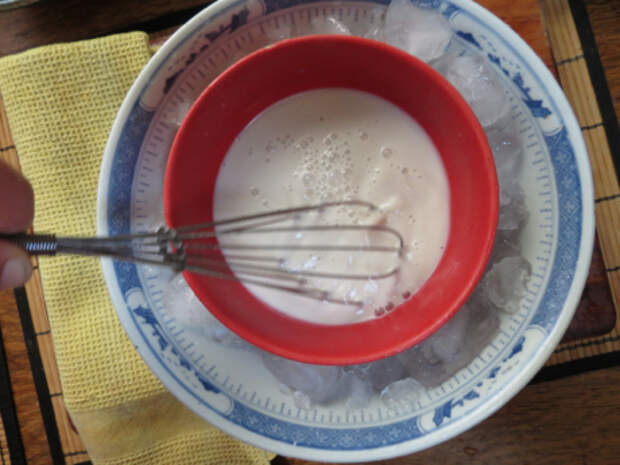
2. Place the smaller bowl in the ice and push down a bit, nestling it in. It should be almost completely pushed into the ice, with only the mouth of the bowl just above the ice.
Fill the smaller bowl halfway with no more than a pint of ice cream custard base (I like this recipe from Martha).
3. Use a whisk to beat the ice cream for a full 15 minutes (if you can, have a friend switch for you halfway through -- it’s quite a workout!).
4. Cover the bowls with a clean kitchen towel and place the whole thing (both bowls) in the freezer. Freeze for 45 minutes.
5. Whisk again for 10 minutes, then freeze for at least two hours, or until firm.
6. Scoop into bowls and serve.
Make whipped cream…without a stand mixer or an electric beater!
The “two bowls, ice, and a whisk” set-up used to make ice cream by hand is also handy for making whipped cream by hand, since cream whips faster and better when it’s ice-cold.
1. Set the bowls up as with the ice cream, but skip the rock salt.
2. Pour 2 cups of heavy cream and a teaspoon of confectioner’s sugar, if you want it to be sweet, into the smaller bowl and whip by hand, using a whisk, until stiff peaks form in the cream. (this will take between 8 and 12 minutes of consistent whipping).
3. Be sure to stop as soon as the peaks form, otherwise the cream will seize up and start to turn into butter.
Grind ice, coffee beans, whole spices, and nuts…without a grinder or food processor!
Don’t underestimate the power of the zip-top bag. You can crush just about anything to your desired consistency by putting it into a zip-top bag and using a rolling pin or mallet to smack it until it’s broken into a million little pieces. Just fill and seal the bag, making sure to push all the air out of it, then keep smacking until your desired consistency is reached. Be sure to do this on a surface that can take a good beating, like a butcher block table or a sturdy counter.
And speaking of rolling pins…
Make fondue…without a fondue pot!
Sweet and savory fondue are both delicious and fun hands-on party treats, but many people believe you need to have one of those fondue pots made so popular in the 1970s. While fun, they’re totally unnecessary for you to enjoy a cheesy or chocolatey fondue fest.
1. To melt the chocolate or cheese, simply make a double-boiler by filling one pot about halfway with water and placing a heat-proof bowl on top of it.
2. Fill the bowl with grated or chopped cheese or chocolate (or use chocolate chips) and melt over medium-low heat, until creamy.
3. Serve the fondue immediately after cooking, keeping it over the hot water to keep it warm.
Make juice…without a juicer!
OK, this one does require one regular appliance, but it can be a cheap blender, a food processor or even a non-electric food mill.
1. Puree your desired fruit/vegetable combination (I like beets, lemons, kale, celery and apples) in a blender, food processor, or food mill until completely pureed.
2. Strain the mixture through a fine-meshed strainer and into a glass, until the juice and pulp have completely separated from one another.
3. Sip and enjoy!
Make popcorn…without a popper or microwave!
You don’t need a fancy air popper or a microwave to make high quality popcorn. All you need to make it the old-fashioned (and, in my opinion, better) way is a 3-quart pot with a lid, kernels, and some high smoke point oil, like coconut, vegetable, grapeseed or peanut.
1. Heat 3 tablespoons of oil in a 3-quart saucepan over medium-high heat.
2. Put 3 or 4 popcorn kernels into the oil and cover the pan.
3. When the kernels pop, add 1/3 cup of popcorn kernels in an even layer.
4. Cover, remove from heat, and count to 30 again (this gets the oil to the right temperature and gets the kernels ready to pop).
5. Return the pan (still covered) to the heat and let pop until the popping slows to 7-8 seconds between pops.
6. Once the corn has finished popping, pour into a large bowl and top with desired toppings (I like olive oil and Parmesan). If you want to melt butter to put on your popcorn, do so in the hot pan you just cooked the corn in!
Make fresh pasta…without a pasta roller!
My favorite instructions for this are illustrated over at Cook’s Illustrated, and I can tell you from experience that this process is absolutely worth it. All you need is fresh pasta dough (I like this dough recipe), flour for dusting, a rolling pin, plastic wrap, and a sharp knife. It’s a bit of a time commitment, but so worth it.
Make coffee…without a coffeemaker!
I own two French presses and a fancy coffeemaker, and I still make my coffee this way sometimes -- it just tastes so damn good. This is also a great trick for camping.
1. Fill a heatproof container with 2 tablespoons ground coffee for every cup of boiling water.
2. Let the coffee and water steep for 5-6 minutes, stirring once or twice.
3. Strain the coffee using a fine mesh strainer right into the mug(s).